CCTV Blueprint for Unreal Engine
Table of Contents
1. Create or obtain meshes for your camera #
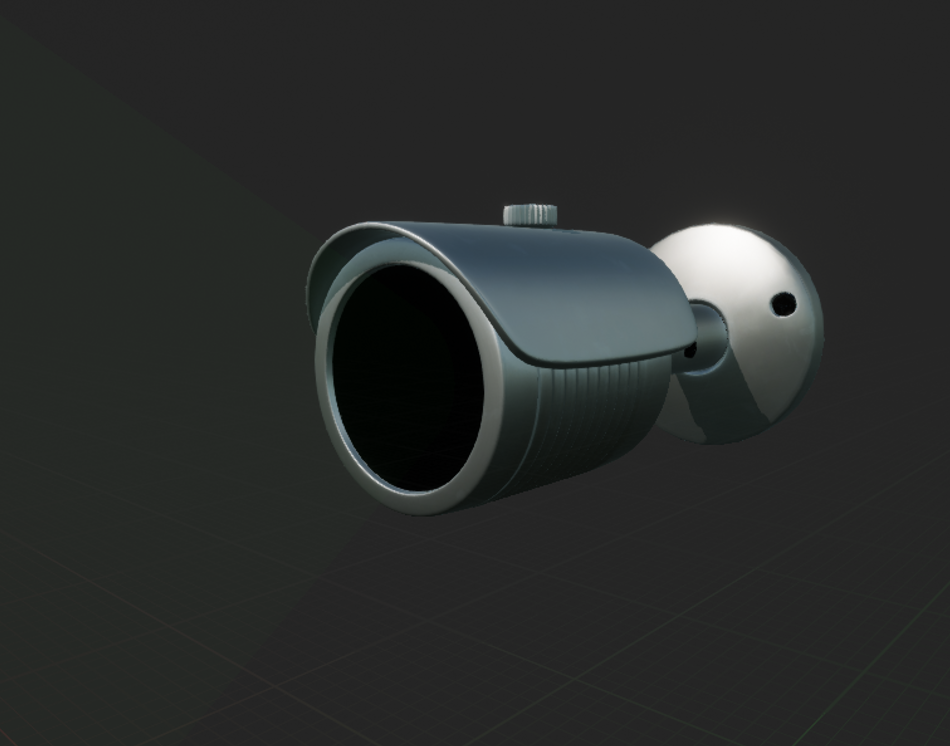
In this step, I chose simplicity and went ahead and grabbed a free
Altcam DCF51IR surveillance camera asset from
TurboSquid.
Feel free to use any other asset that you may like more as the same process would apply here.
The main reason I decided to go for the Altcam was the flexibility in the asset, since the base and the body of the camera are well split and allow for clean rotation.
I would recommend getting the .fbx file from the assets as well as the textures.
Camera_altcam_DCF51IR_max2013_textures.rar  3ds Max  (version: 2013) - 4.72 MB
Camera_altcam_DCF51IR_FBX.rar  Autodesk FBX  (version: 2009) - 2.5 MB
2. Create a project and import content #
Once you have your mesh, you can go ahead and create a new project.

In the content browser, we’re going to create a new CCTV folder to store all related assets. and in this folder we’re going to import the Camera_altcam_DCF51IR_FBX.fbx file as well as the textures. You can use the default import settings
Once the content is imported, you should see something like this:
Once you’ve updated this, you can go ahead and save the mesh.

3. Update imported content #
1. Mesh update #
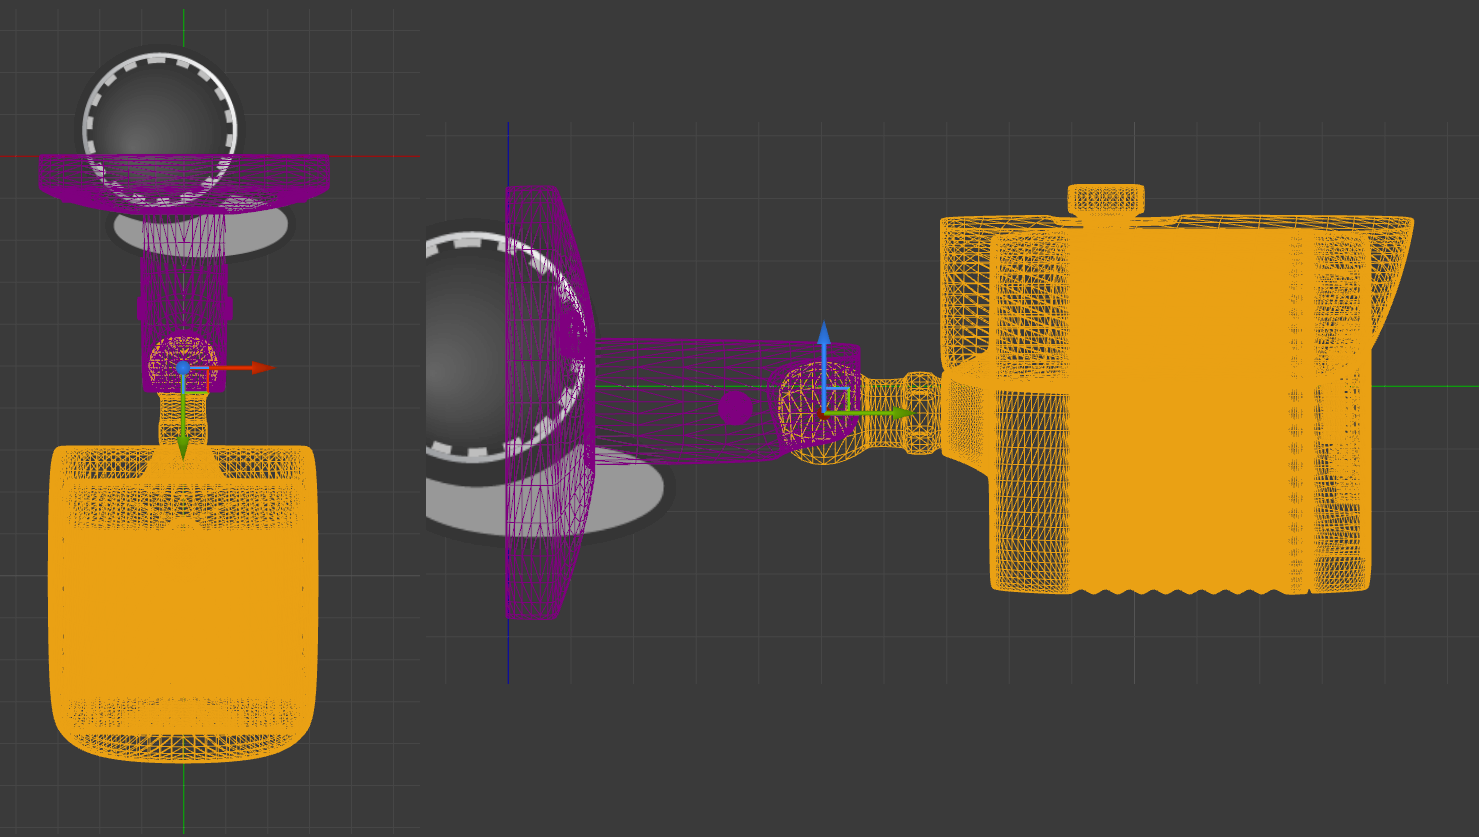
In order to make sure that the head will rotate properly around its axis, we need to update the pivot point for the camera body mesh.
To achieve this, we’re going to place the Camera_altcam_DCF51IR_FBX_Camera_body in our level and swith our editing mode to “Modelling mode” (Shift-5), switch the perspective view to top and move the pivot point to the center of the rotation ball.
To move the pivot point, select the pivot editing mode.
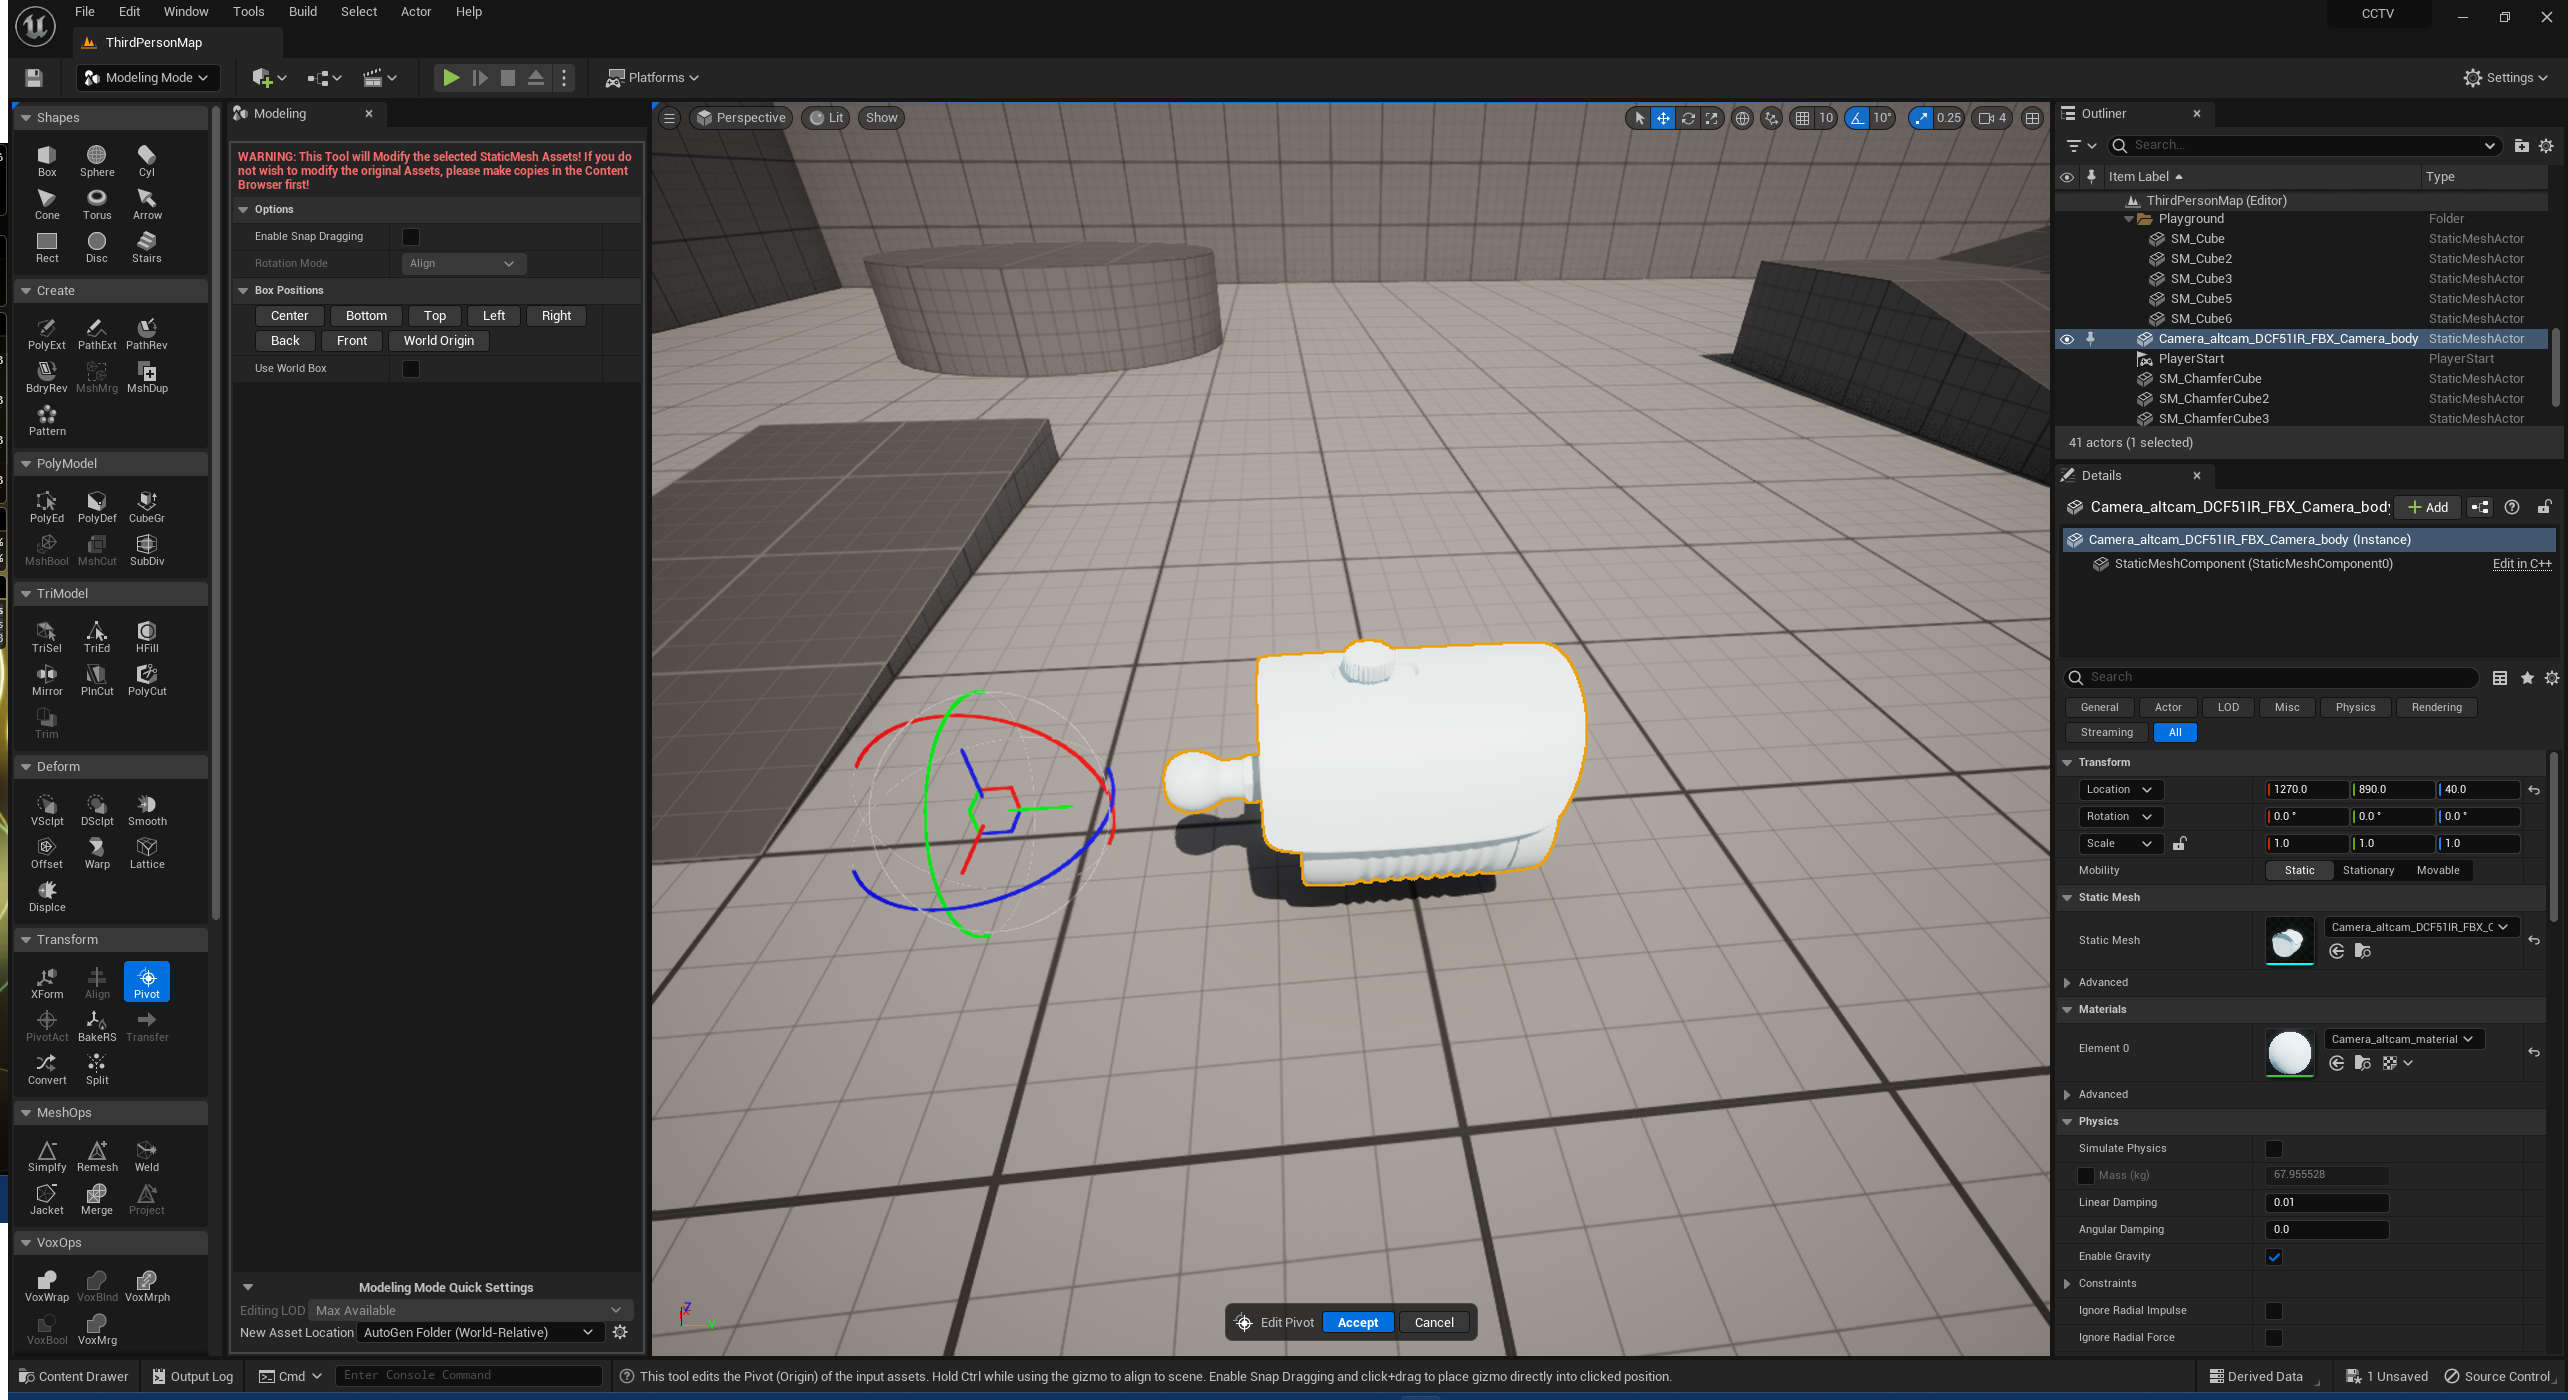
You want to place the pivot point as shown below.

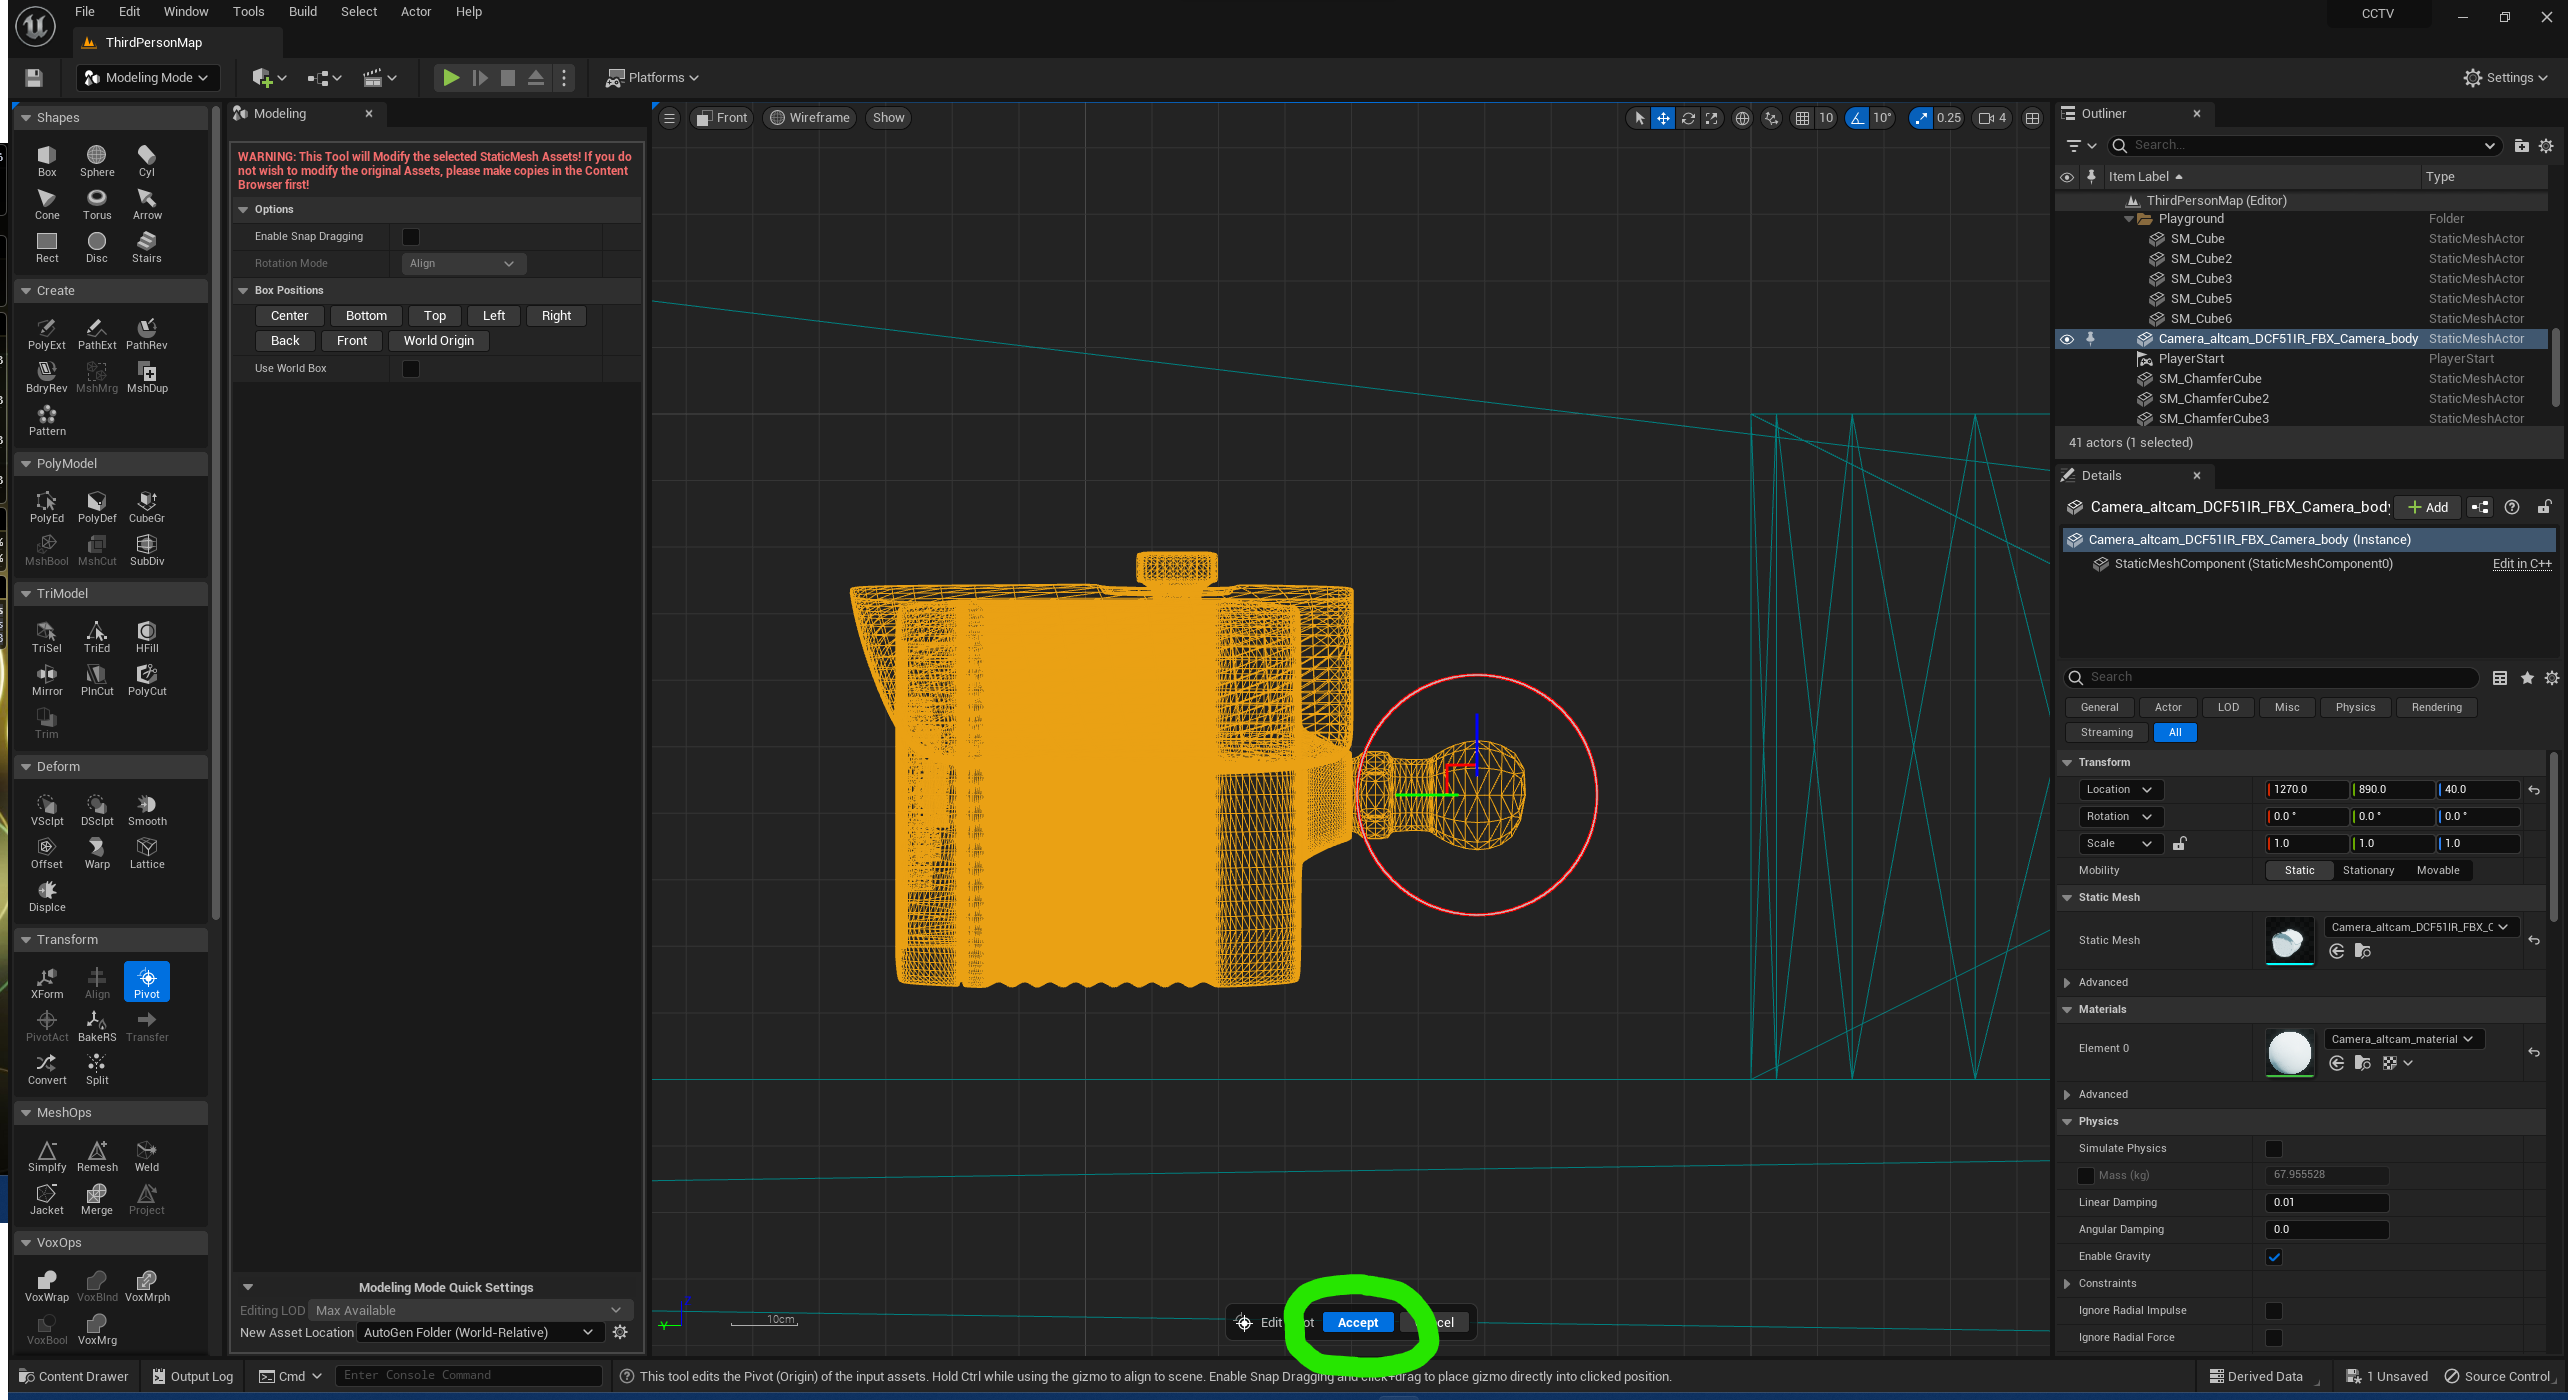
You can now accept the changes and save the mesh.
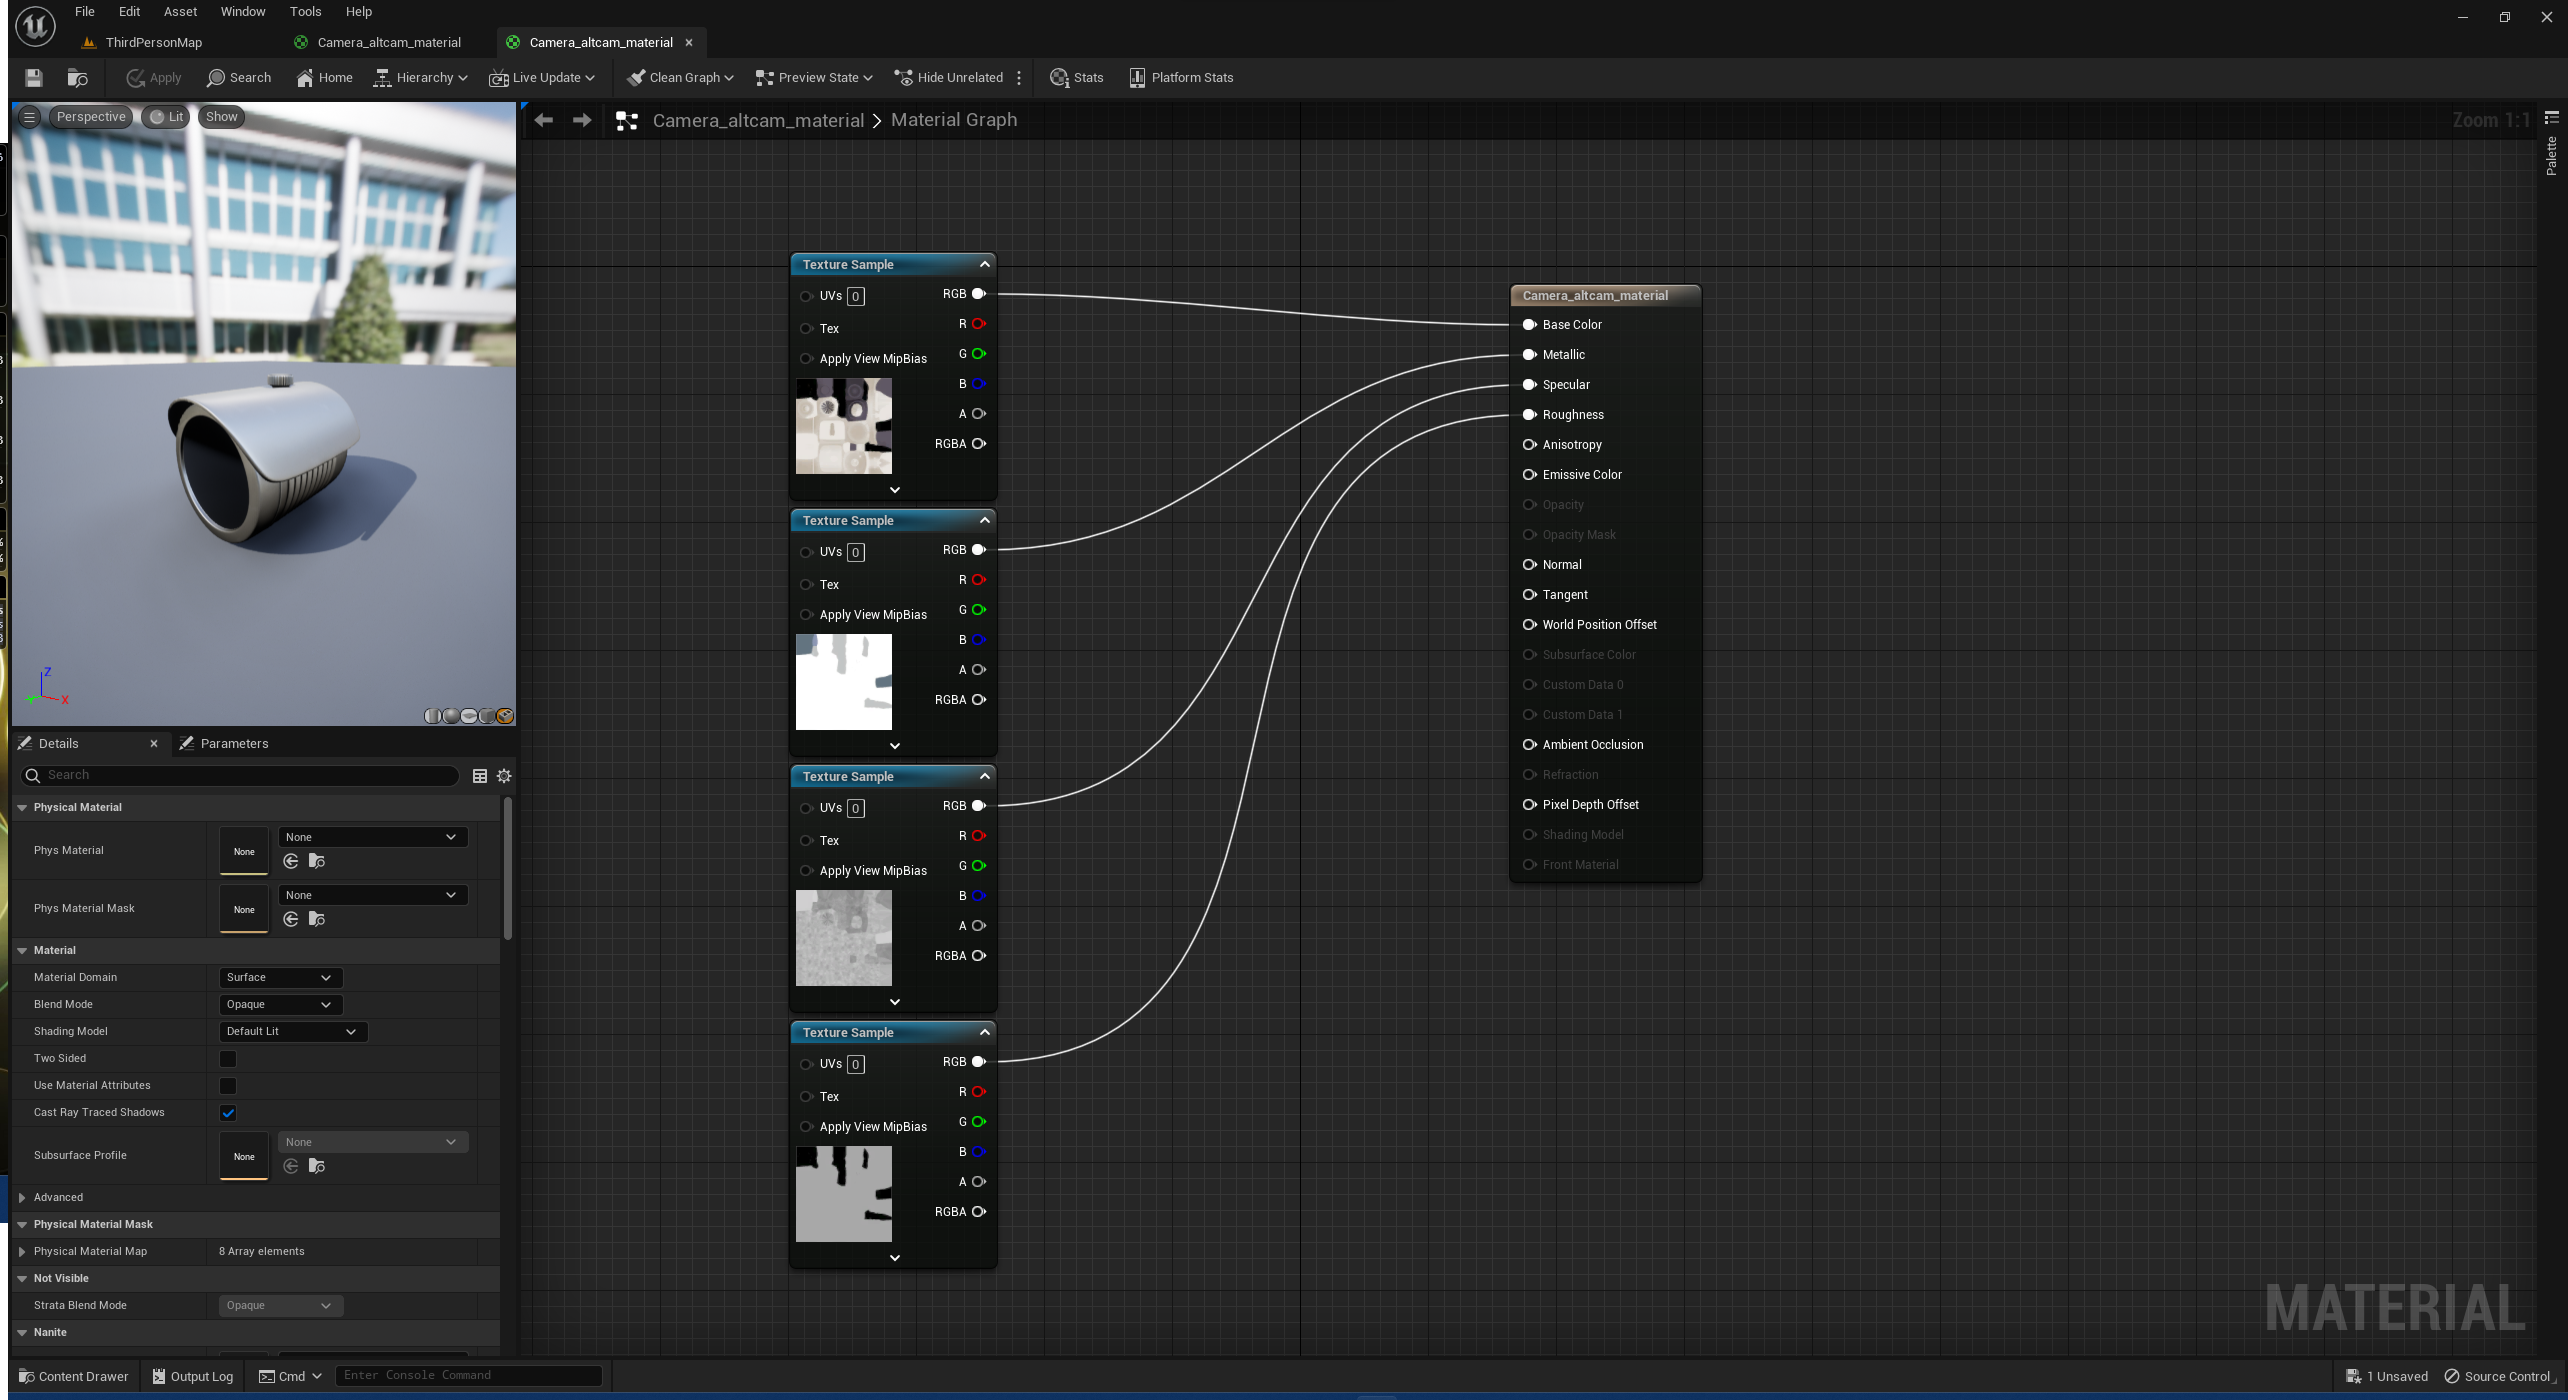
2. Material update #
- Add the
Camera_AltCam_Diffusetexture and attach theRGBnode from the texture to theBase Colornode of the Material - Add the
Camera_AltCam_Reflectiontexture and attach theRGBnode from the texture to theMetallicnode of the Material - Add the
Camera_AltCam_Glossinesstexture and attach theRGBnode from the texture to theSpecularnode of the Material - Add the
Camera_AltCam_iortexture and attach theRGBnode from the texture to theRoughnessnode of the Material
4. Blueprint creation #
1. Setting up the meshes #
1. Camera body #
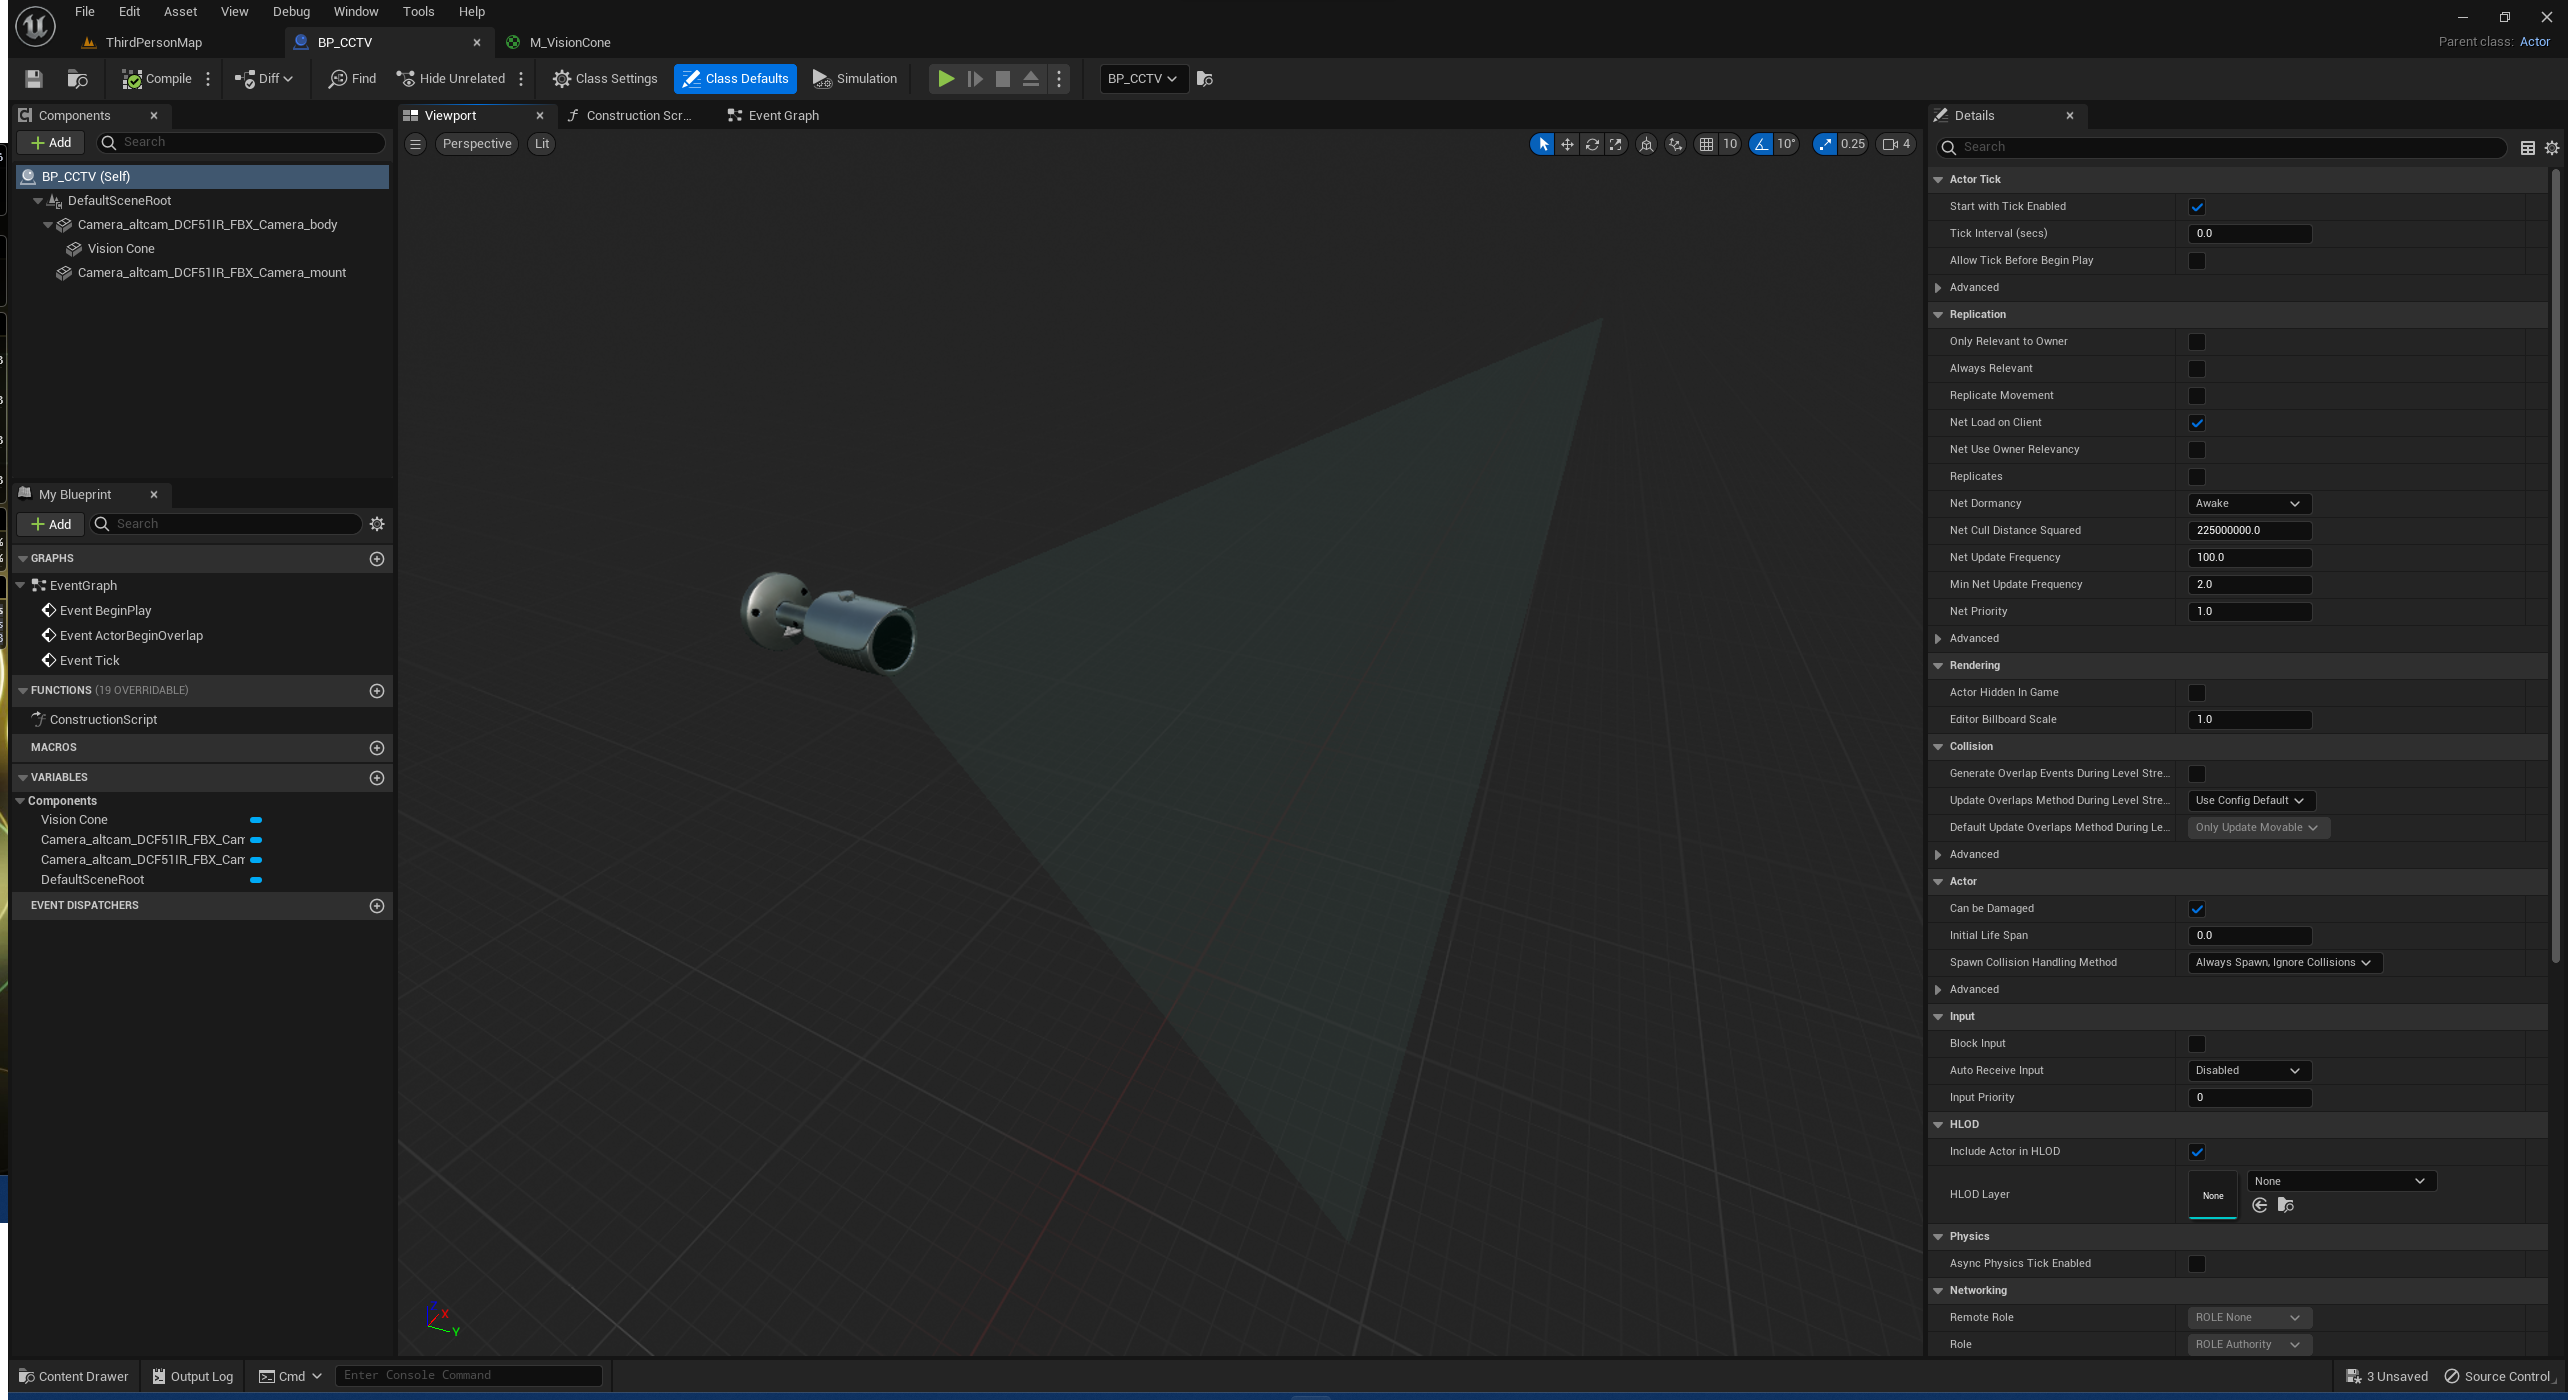
Now we are going to assemble the blueprint, first we create an Actor blueprint, we can give it any name but for the rest of the article I’ll use BP_CCTV as the blueprint name.
We’re going to add our 2 meshes into the blueprint, next step will be to rotate and align components so that they fit perfectly as shown below
2. Adding a vision cone #
With this CCTV Camera, we want to make sure that characters can get spotted. To achieve this, we are going to add a “transparent” cone with collisions.
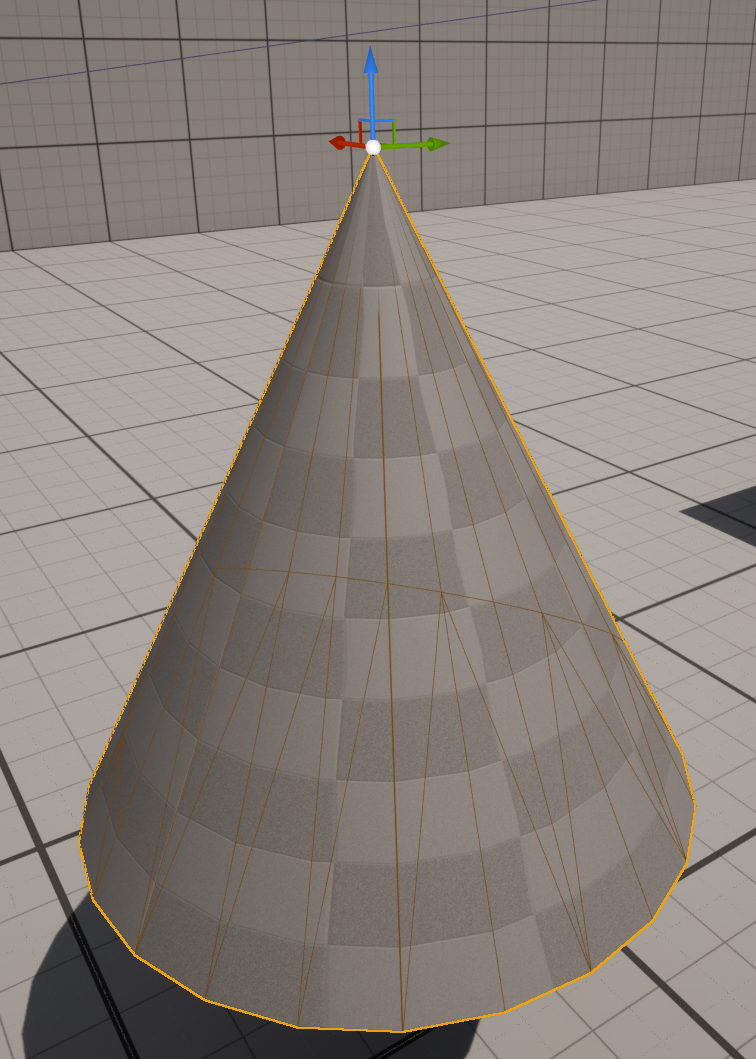
There are a couple of options for this, we could simply add the cone primitive but the challenge with that will be the pivot point if we need to scale the cone size (which we do). So to solve that problem, we’re going to create a cone with the proper location for the pivot point.
The simple solution is to copy the engine provided cone into our meshes and updated it ( like we did for the camera head).
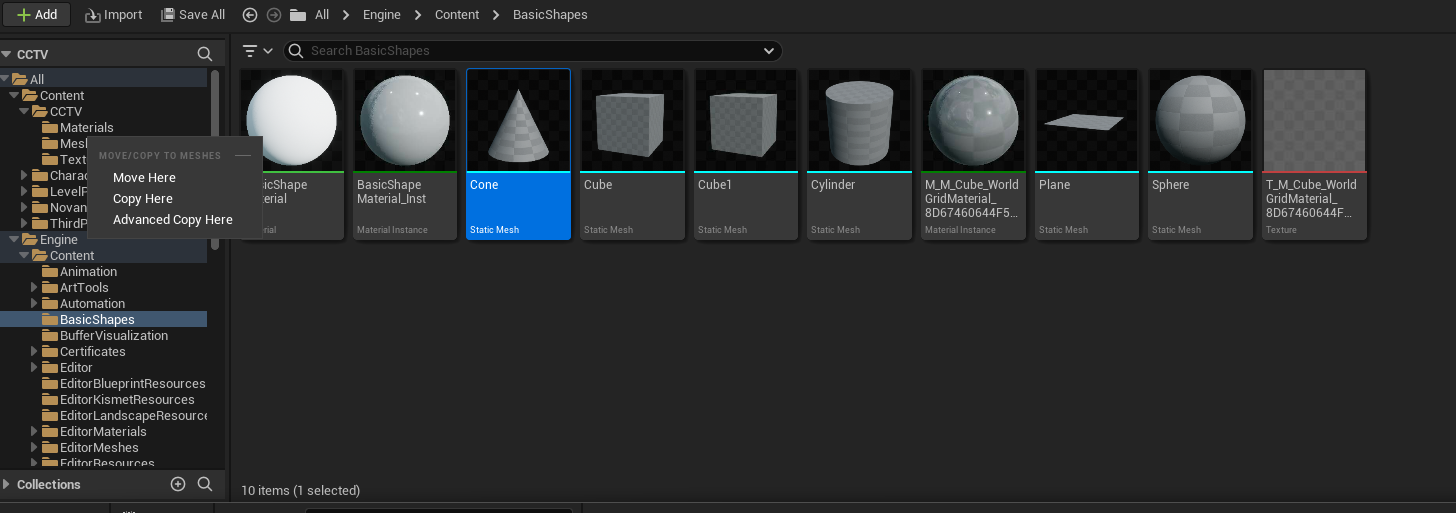
Once we have the cone, we can add it as a child of the Camera_body so they both rotate together.
3. Create the vision cone material #
As you can see, the vision cone is using a solid material, we’re going to create a default transparent material to give it a better effect and allow our developer to hide it completely from the player if theyr wish to do so.
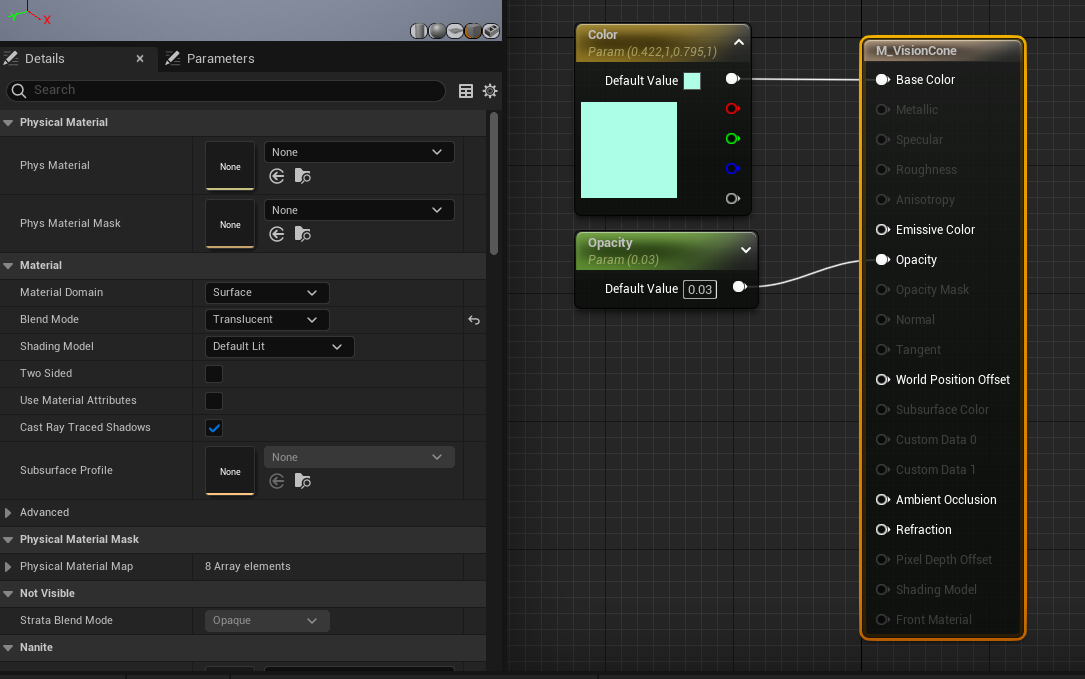
In our CCTV/Material directory, we’re going to add a Material M_VisionCone that will be the default material for the cone.
The first thing we’re going to do is to set the Blend mode to translucent on the material to enable opacity.
We then add a float parameter to control that opacity dynamically and finally, we’re adding a vector parameter to control the tint of the color
4. Final mesh layout result #
2. Setting up the constructor #
1. Camera rotation control #
Our camera, to be effective, needs to be able to be positioned anywhere. To do so, we need the user to be able to change a few settings without changing the Blueprint code.
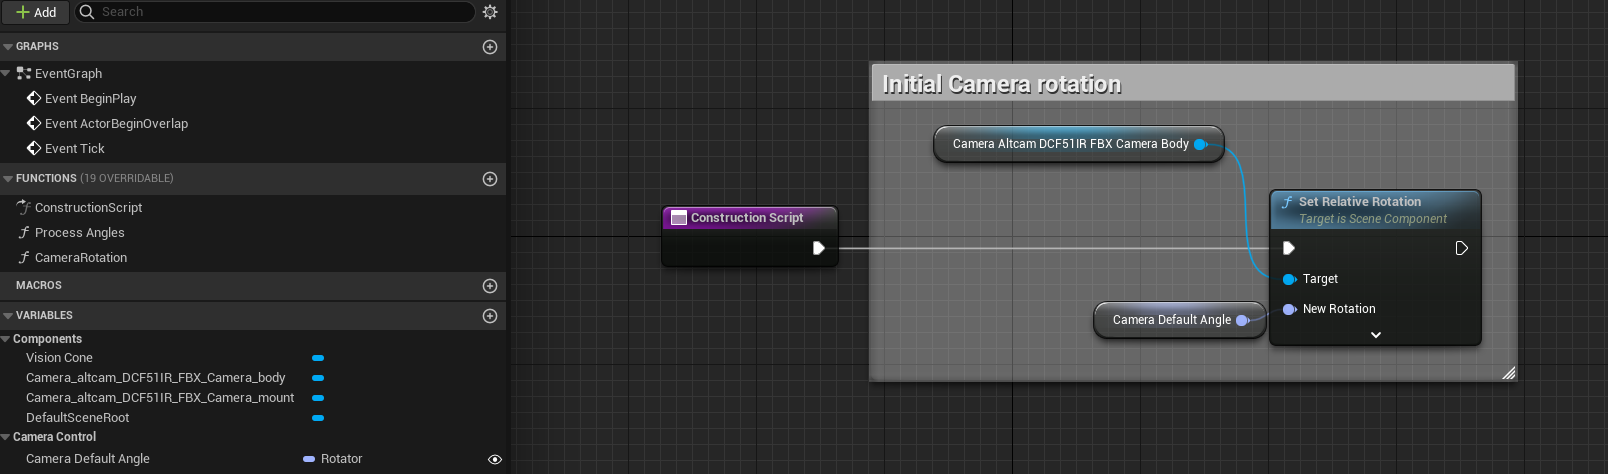
First, we’re going to expose the angle for the camera. Create a new variable in the blueprint named Camera Default Angle of type Rotator
and in the constructor script, we’re going to set the rotation angle of the camera body to this rotation.
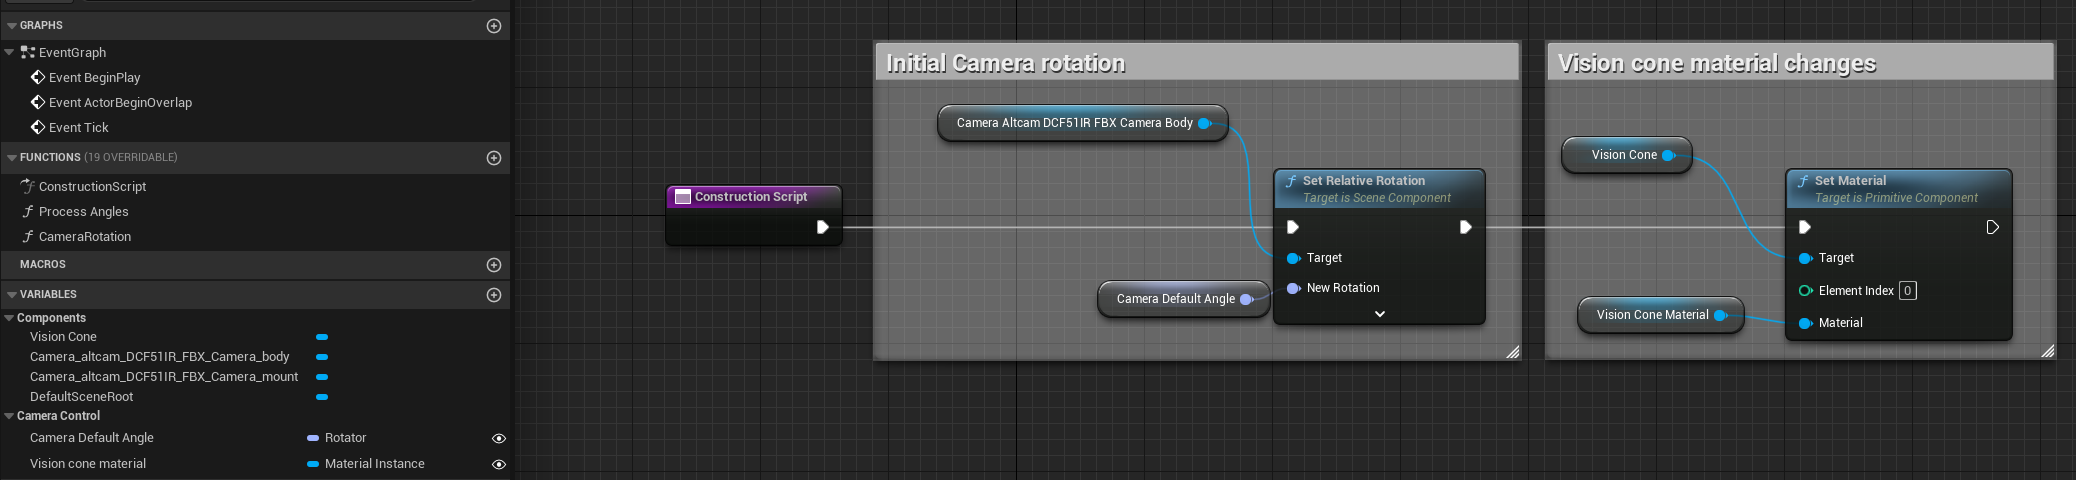
2. Camera cone material changes #
In order to provide more flexibility for the vision cone, we’re going to allow the blueprint user to set a different material. To do that, we’re going to be adding a new public variable Vision cone material of type material instance and set it in the constructor dynamically. We also need to create a new material instance from
the previously created material. This material instance will become our default Vision cone material
3. Camera rotation animation #
If we want our CCTV to be realistic, we should probably make it animate during gameplay. We’re going to add a new variable to allow for rotation on any axis during play.
This is going to take a bit more work as there is quite some code involved to process the right angle based on the base angle of the camera
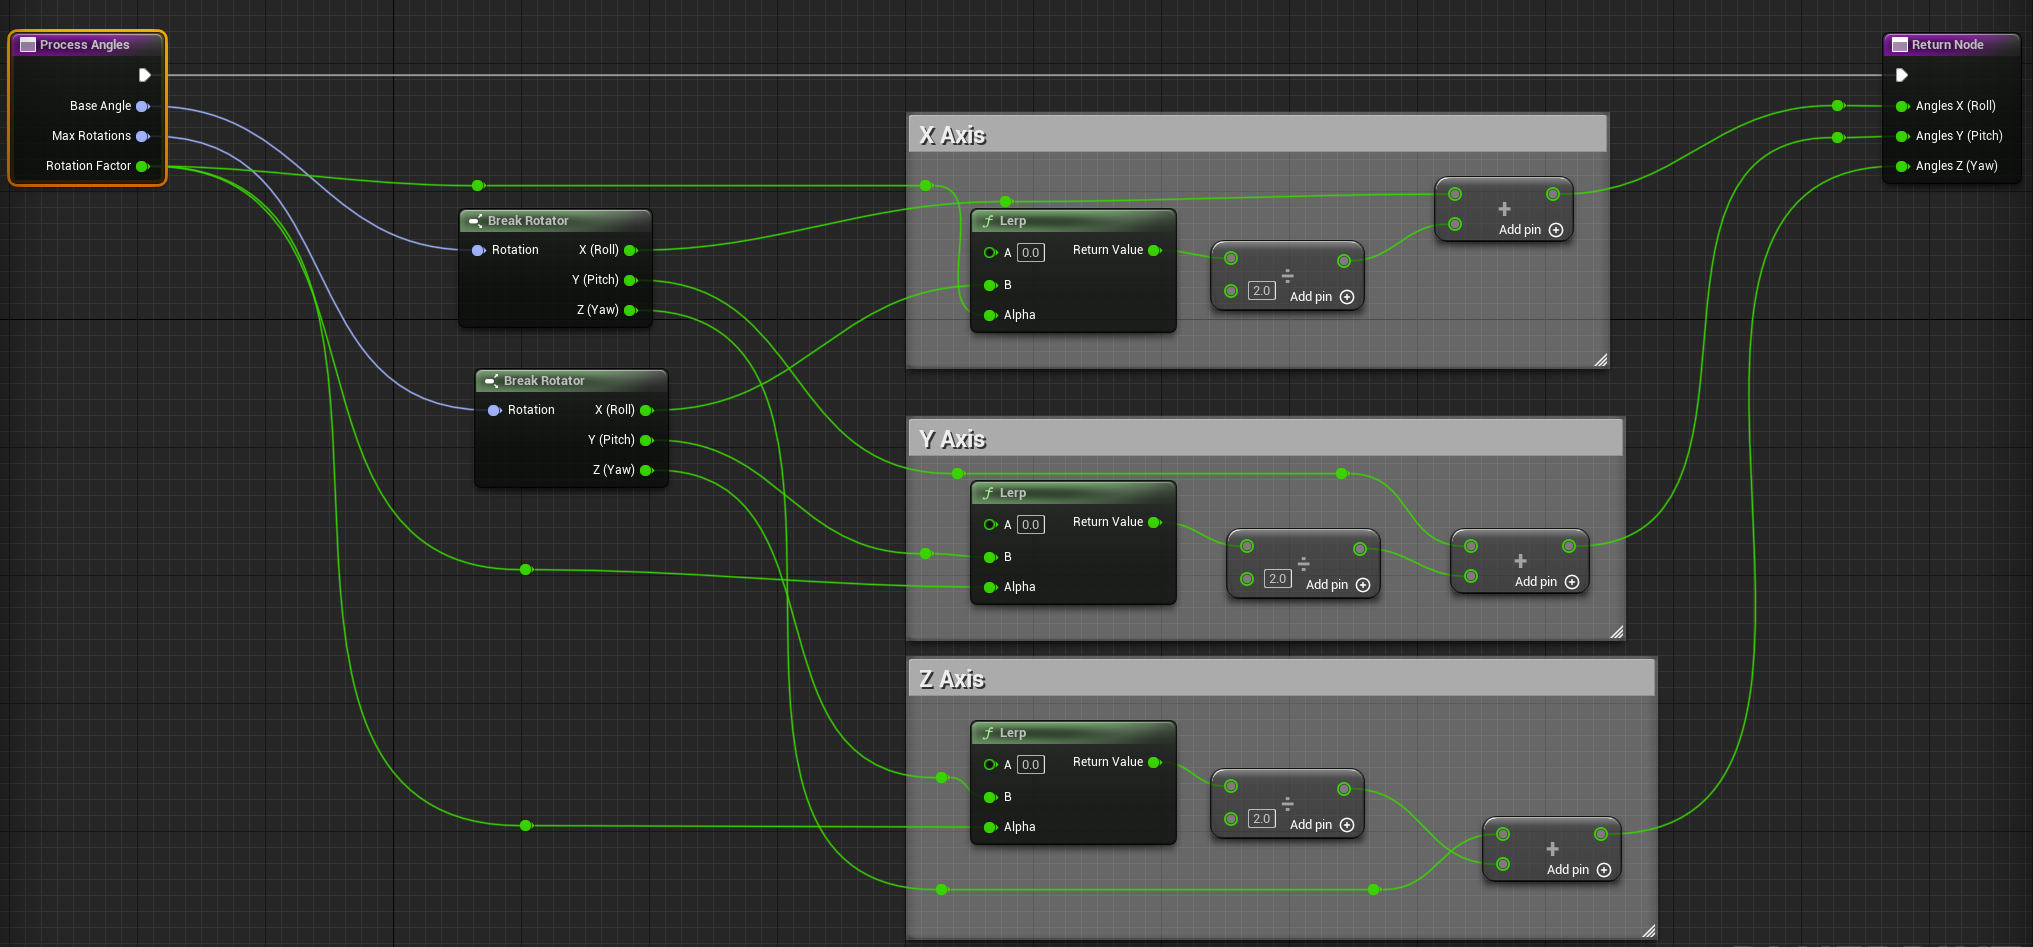
1. Calculation the angles #
\(finalRotationAngle = (RotationFactor * MaxAngle) / 2 + BaseAngle\)
For example, with a base of 25 and a desired rotation factor of 33% of a max 90 angle, we should have a finalRotation angle of 39.85 We are divifing the result by 2 because our rotation factor range will be from -1 to 1
\(RotationFactor * MaxAngle = 29.7\)
\(29.7/2 + 25 = 39.85\)
In order to make the calculation easier, we are going to create a function called process angle with 3 float inputs
2. Creating the animation #
When OnEventBeginPlay triggers, we’re going to create a timeline loop to ensure smooth rotation of the camera. The timeline will allow us to calculate the desired rotation factor based on the maximum rotation angle. We also want to provide a mechanism for developers to set the speed for a full rotation.
First, we’re going to create a Camera rotation speed Factor public float variable which will be used to control timeline playback speed (we will default it to 1).
Then we’re going to use a flip/flop to switch direction for the rotation and finally, we’re going to link it to a timeline.
When the timeline is finished, we send it back to the flip/flop giving us an infinite loop animation.
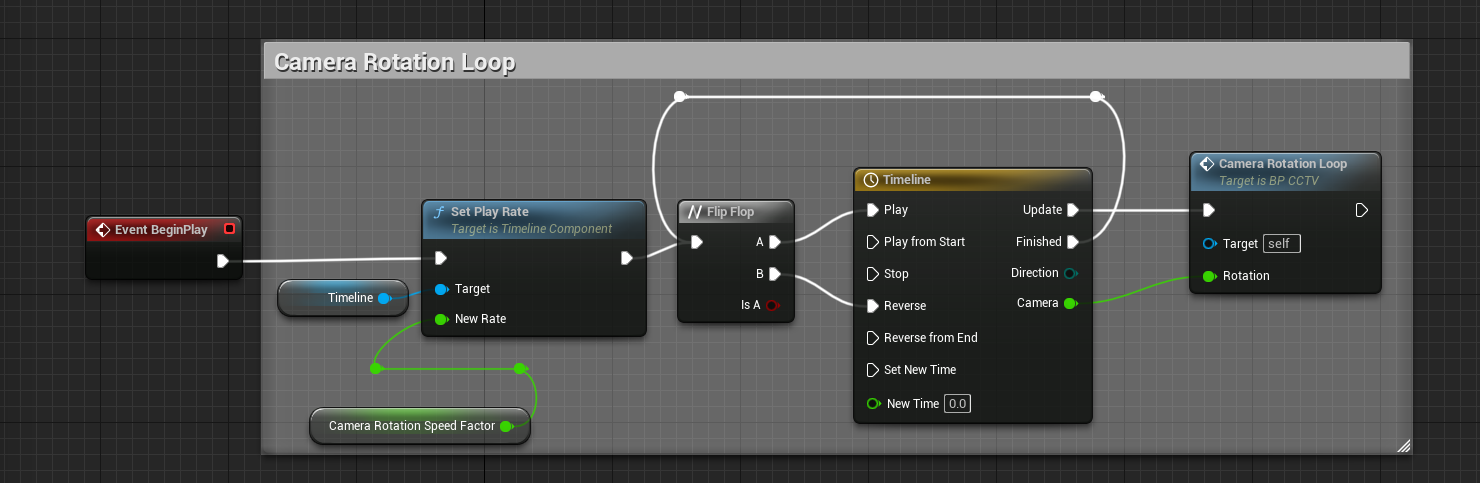
Details of the timeline:

To test this, you can add the blueprint to your world, setup the desired values and press Play. This should look like this
3. Spotting Logic #
In most games, being caught by a CCTV Camera will have effects on the stealth of the player. To do that, we’re now going to add that logic.
1. Collision and rendering #
First, we need to do a few updates to our collision cone. First, we need to make sure that it is not rendered when raytracing is enabled as we don’t want shadow to be created from the cone.
In the cone mesh details, we’re going to disable Visible in Ray Tracing, Visible in Reflection Capture and Visible in Real time Sky Capture under the Rendering > Advanced category

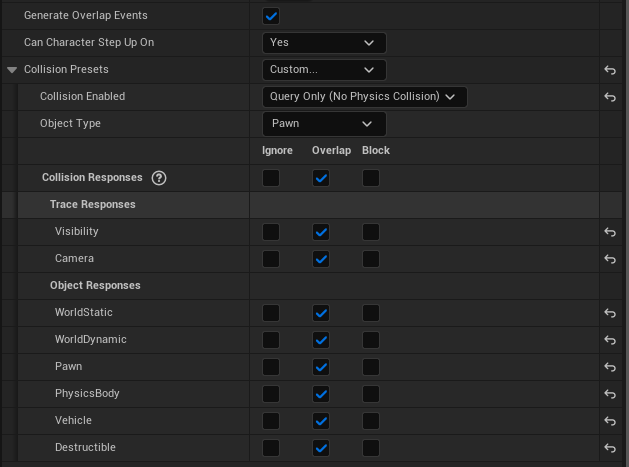
We also want to make sure the cone collision is only notifying to avoid having objects blocked by the cone. We’re going to use a Custom collision preset on Pawn set to all Overlap. We’ll call this event Character Spotted.
2. Event management #
Once a charcter start to overlap with our cone, we want to trigger an event that the player or level can capture. To do that, we’re adding an event dispatcher that will return the character it overlapped with (provide additional validation)
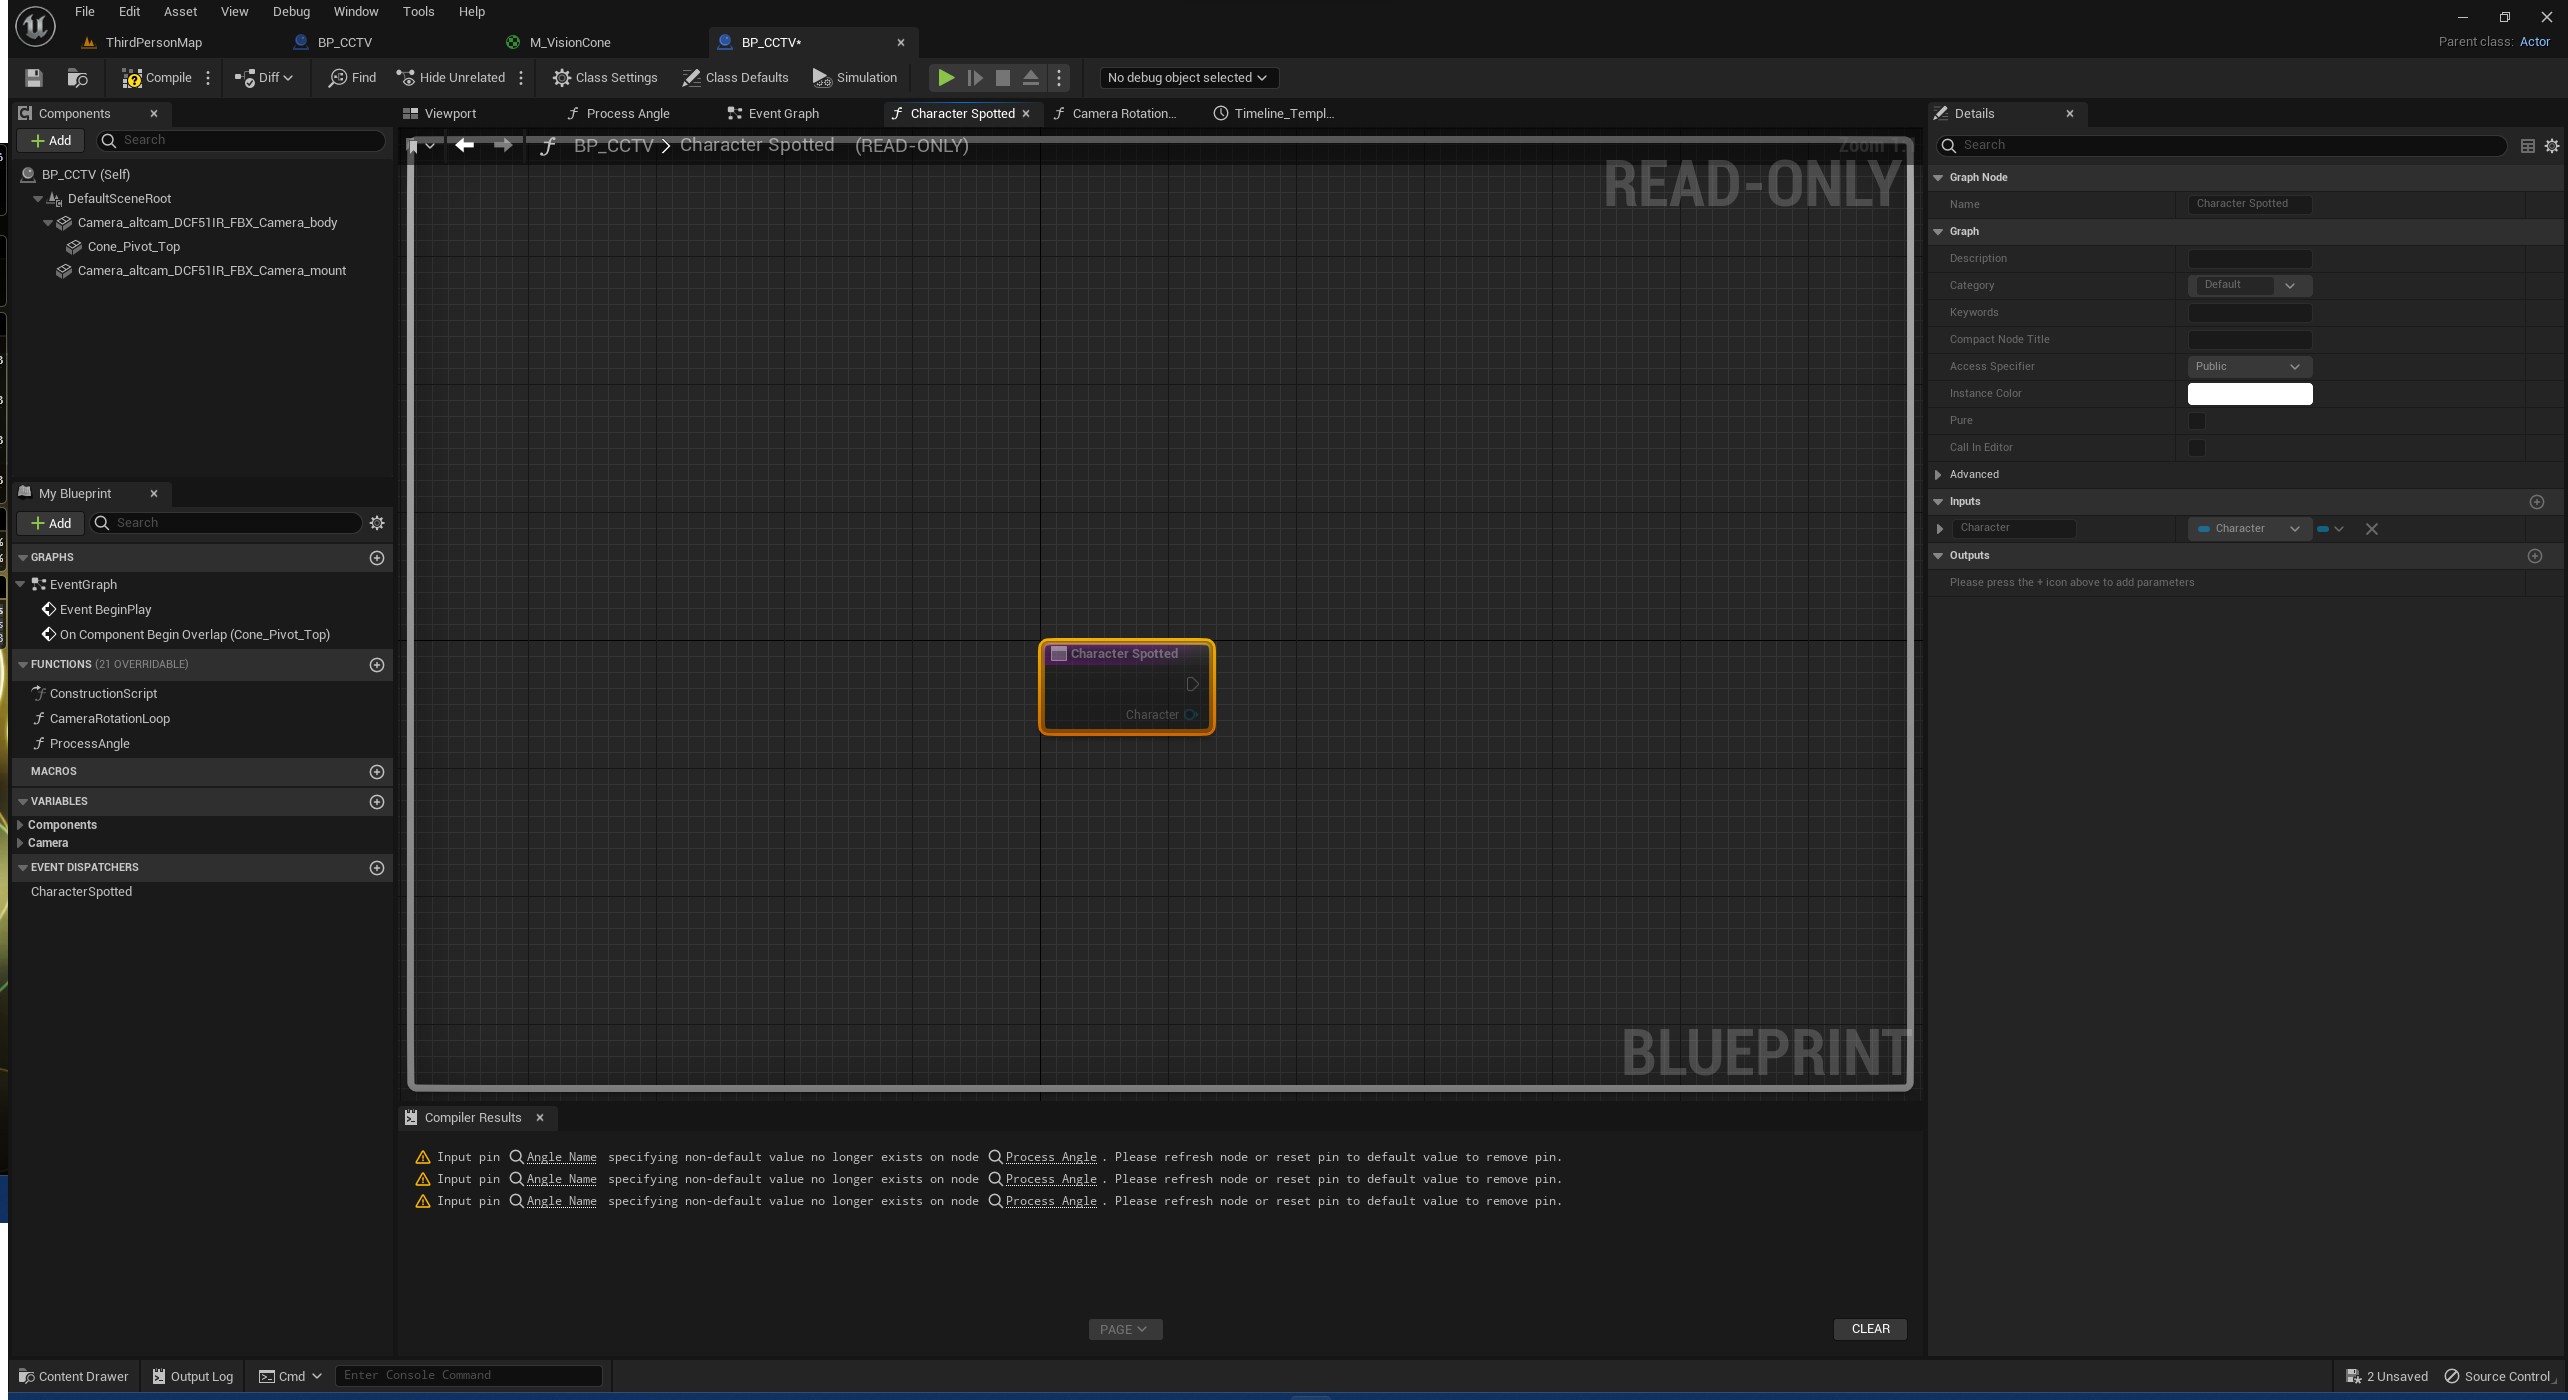
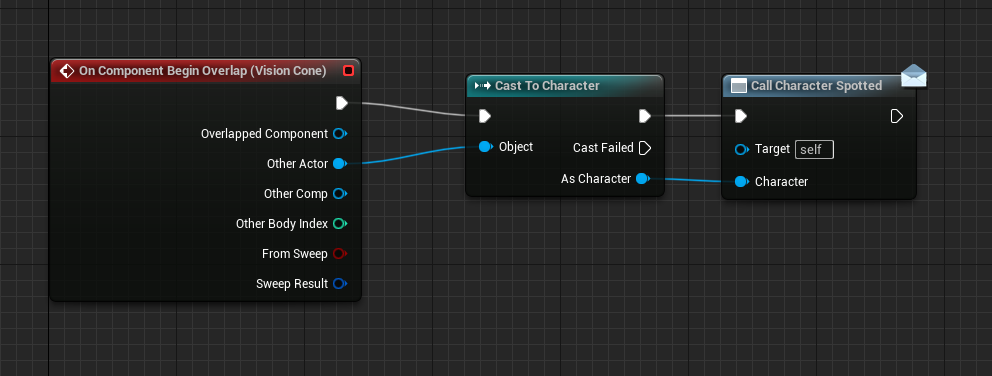
Now, all we need to do is to trigger this event when a components begin to overlap.
In the event graph, we’re going to respond to the OnComponentBeginOverlap on the Cone
3. How to bind character spotted event to your character #
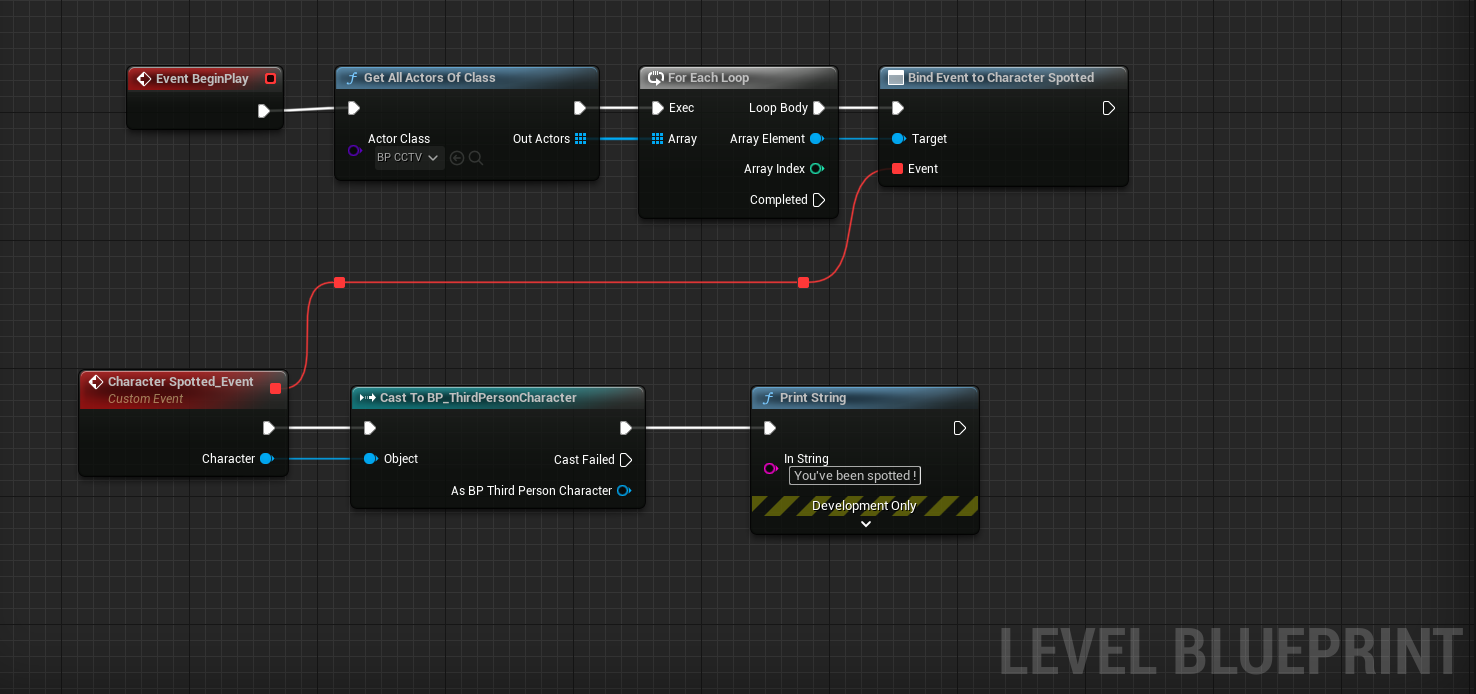
Now that our blueprint emits events, we should so something about it. In your Level blue print, you simply bind all BP_CCTV actors to this event and add the expected behaviour there.
In the following example, we simply print a string when the player enters the cone. Ideally, we would store this in the player and reflect this in the player HUD.
Conclusion #
And voila, you now have a fully functionning CCTV Camera blueprint mimicking the logic from Hitman.